Today I Learned This Part 2: Pretrained Neural Networks What are they?
Deeplearning is the buzz word right now. I was working on the course for deep learning by Jeremy Howard and one thing I noticed were pretrained deep Neural Networks. In the first lesson he used the pretrained NN to predict on the Dogs vs Cats competition on Kaggle to achieve very good results.
What are pretrained Neural Networks?
So let me tell you about the background a little bit. There is a challenge that happens every year in the visual recognition community - The Imagenet Challenge. The task there is to classify the images in 1000 categories using Image training data. People train big convolutional deep learning models for this challenge.
Now what does training a neural model actually mean? It just means that they learn the weights for a NN. What if we can get the weights they learn? We can use those weights to load them into our own NN model and predict on the test dataset. Right?
But actually we can go further than that. We can add an extra layer on top of the NN they have prepared to classify our own dataset.
In a way you can think of the intermediate features created by the Pretrained neural networks to be the features for the next layer.
Why it works?
We are essentially doing the image classification task only. We need to find out edges, shapes, intensities and other features from the images that are given to us. The pretrained model is already pretty good at finding these sort of features. Forget neural nets, if we plug these features into a machine learning algorithm we should be good.
What we actually do here is replace the last layer of the neural network with a new prediction/output layer and train while keeping the weights for all the layers before the second last layer constant.
Code:
I assume that you understand Keras a little. If not you can look at the docs. Let us get into coding now. First of all we will create the architecture of the neural network the VGG Team created in 2014. Then we will load the weights.
Import some stuff
import numpy as np
from numpy.random import random, permutation
from scipy import misc, ndimage
from scipy.ndimage.interpolation import zoom
import keras
from keras import backend as K
from keras.utils.data_utils import get_file
from keras.models import Sequential, Model
from keras.layers.core import Flatten, Dense, Dropout, Lambda
from keras.layers import Input
from keras.layers.convolutional import Convolution2D, MaxPooling2D, ZeroPadding2D
from keras.optimizers import SGD, RMSprop, Adam
from keras.preprocessing import image
VGG has just one type of convolutional block, and one type of fully connected (‘dense’) block. We start by defining the building blocks of our Deep learning model.
def ConvBlock(layers, model, filters):
    for i in range(layers):
        model.add(ZeroPadding2D((1,1)))
        model.add(Convolution2D(filters, 3, 3, activation='relu'))
    model.add(MaxPooling2D((2,2), strides=(2,2)))

def FCBlock(model):
    model.add(Dense(4096, activation='relu'))
    model.add(Dropout(0.5))
Now the input of the VGG Model was images. When the VGG model was trained in 2014, the creators subtracted the average of each of the three (R,G,B) channels first, so that the data for each channel had a mean of zero. Furthermore, their software that expected the channels to be in B,G,R order, whereas Python by default uses R,G,B. We need to preprocess our data to make these two changes, so that it is compatible with the VGG model. We also add some helper functions.
#Mean of each channel as provided by VGG researchers
vgg_mean = np.array([123.68, 116.779, 103.939]).reshape((3,1,1))

def vgg_preprocess(x):
    x = x - vgg_mean     # subtract mean
    return x[:, ::-1]    # reverse axis bgr->rgb

def VGG_16():
    model = Sequential()
    model.add(Lambda(vgg_preprocess, input_shape=(3,224,224)))
    ConvBlock(2, model, 64)
    ConvBlock(2, model, 128)
    ConvBlock(3, model, 256)
    ConvBlock(3, model, 512)
    ConvBlock(3, model, 512)
    model.add(Flatten())
    FCBlock(model)
    FCBlock(model)
    model.add(Dense(1000, activation='softmax'))
    return model


def finetune(model, num_classes):
    # Drop last layer
    model.pop()
    # Make all layers untrainable. i.e fix all weights
    for layer in model.layers: layer.trainable=False
    # Add a new layer which is the new output layer
    model.add(Dense(num_classes, activation='softmax'))
    model.compile(optimizer=Adam(lr=0.001),
                loss='categorical_crossentropy', metrics=['accuracy'])
    return model


# A way to generate batches of images
def get_batches(path, dirname, gen=image.ImageDataGenerator(), shuffle=True,
                batch_size=64, class_mode='categorical'):
    return gen.flow_from_directory(path+dirname, target_size=(224,224),
                class_mode=class_mode, shuffle=shuffle, batch_size=batch_size)
The hard part is done now. Just create a VGG object and load the weights.We will need to load pretrained weights into the model too. You can download the “VGG16_weights.h5” file here
model = VGG_16()
model.load_weights('VGG16_weights.h5')
# Since our dogs vs cat dataset is binary classification model
ftmodel = finetune(model,2)
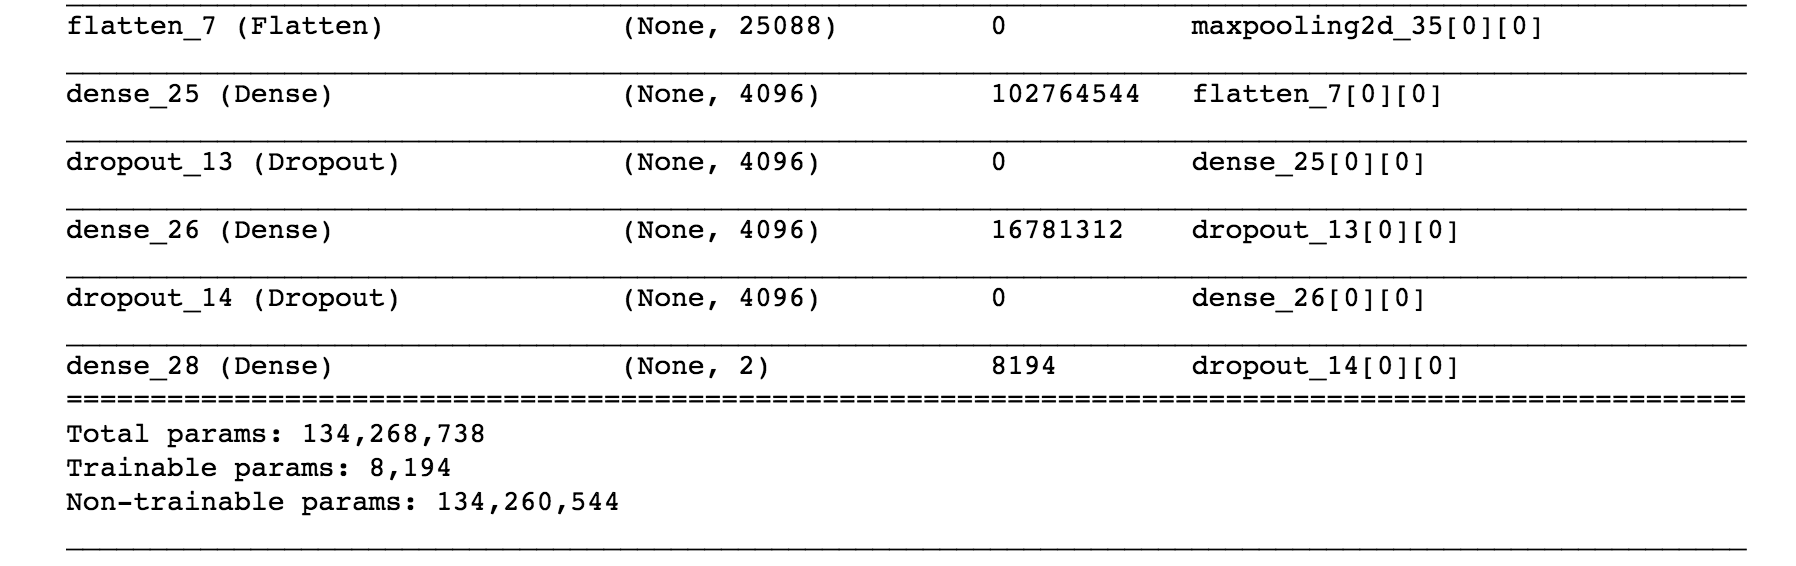
print ftmodel.summary()
path = "dogscats/"
batch_size=64

# Iterators to get our images from our datasets. The datasets are folders named train and valid. Both folder contain two directories 'dogs' and 'cats'. In each directory the corresponding images are kept.

batches = get_batches(path,'train', batch_size=batch_size)
val_batches = get_batches(path,'valid', batch_size=batch_size)

# Now run for some epochs till the validation loss stops decreasing.
no_of_epochs=1

for epoch in range(no_of_epochs):
    print "Running epoch: %d" % epoch
    ftmodel.fit_generator(batches, samples_per_epoch=batches.nb_sample, nb_epoch=1,
                validation_data=val_batches, nb_val_samples=val_batches.nb_sample)
    latest_weights_filename = 'ft%d.h5' % epoch
    ftmodel.save_weights(latest_weights_filename)

#Create Predictions on test set. The test images should be in the folder dogscats/test/test_images/ , which is a single directory containing all images.

test_batches = get_batches(path, 'test', batch_size=2*batch_size, class_mode=None)

preds = ftmodel.predict_generator(test_batches, test_batches.nb_sample)

isdog = preds[:,1]
image_id = batches.filenames
final_submission = np.stack([ids,isdog], axis=1)
And we are done!
About Me

I’m a Machine Learning Engineer based in London, where I am currently working with Roku .
Know More